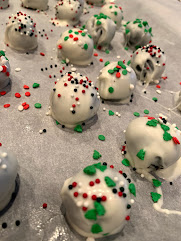
Dinner and Dessert; because life's about balance. Even when things seem super off balance, out of kilter and upside down. A bit of cozy comfort food and a sweet treat that holds special memories is a pretty good place to seek refuge. Yes? Yes!!
How about this for irony--finding a yummy slider recipe that's great for a crowd when you can't have a crowd over to enjoy them. Ohhh, 2020...you're such a delight.
What is a delight, truly, is this easy recipe for Parmesan Chicken Sliders. We had one of those Food Rut weeks where we were tired of all the "standard" recipes from the coveted Make Again pile, so we searched Pinterest for some inspiration. Found it! (thanks, iamhomesteader.com)
To make these, we used Brioche slider buns from Aldi (so delicious!) and Chicken Fries, also from Aldi. I baked those first, then cut them in half so the sliders were easier to bite into. It made a difference!
King’s Hawaiian Rolls
Chicken tenders
Marinara sauce
Provolone cheese
Mozzarella cheese
Basil
Layering is the key to making these mini Chicken Parmesan sandwiches. Be sure to preheat the oven to 350°F. You may have to reset the temperature after cooking the chicken tenders ahead of time.
In a sprayed baking dish, lay down the bottoms of the Hawaiian rolls and add the cheese, chicken, marinara, cheese, and basil. Bet you could brush a little of the butter topping on the buns before you lay on the cheese....mmm!
Put on the tops of the rolls and smother them with the butter topping.
Butter Topping Ingredients:
Butter
Sea salt
Garlic (we used garlic powder)
Parsley
Parmesan cheese
To make the butter topping, simply mix all the ingredients together and brush it all over the rolls!
Cover the sliders with tin foil for the first 20 minutes. Then, bake them for another 5 minutes or so until the tops of the rolls are a golden brown. These are messy but SO good and easy!
Have a cup of marinara on hand for dipping. Enjoy!
I remember eating one of these for the first time and knowing, immediately that they tasted familiar, but not sure if it was cheesecake or chocolate or what. I just knew they were good. Mind blown when I realized they contained just three simple ingredients!
So I started making them myself, once I figured out what they were, and they've been a staple in our holiday cookie line up ever since. Everyone gets in on the process; Alyssa crushes the cookies, I roll them, Mark melts the chocolate* and we all throw the sprinkles on them.
They really couldn't be any easier. Ready? Okay, here we go...Oreo Truffles.
*Okay, this part isn't easy--or at least it wasn't initially. Dear GOD the fury of ruining chocolate before we figured it out. It's a running joke now, and frankly part of the fun!
What You'll Need:
3 dozen Oreo cookies
1 8oz package of cream cheese
White chocolate candy discs
Sprinkles
What You'll Do:
Pulverize the Oreos in a food processor
Add the softened cream cheese to the bowl of a stand mixer with Oreo crumbs
Mix together until incorporated
Scoop and roll into small balls
Chill, on a cookie sheet lined with parchment paper
Melt chocolate and dip truffles in to coat 1-2 at a time
Place back onto cookie sheet and dust with sprinkles
Chill again to set before placing into a container
Store in fridge (or consume immediately, whatever--I'm not judging!)
Makes about 3 dozen or so--depends on the size you make them.


No comments:
Post a Comment